Maya, one of the world’s main software functions for 3D digital animation and visual effects. Maya offers a complete suite of tools for your 3D content creation work ranging from modeling, animation, and dynamics through to painting and rendering to name but a few. With Maya, you can create and edit 3D models in a variety of modeling formats and animate your models using Maya’s suite of animation tools. Maya additionally provides a range of tools to enable you to render your animated 3D scenes to achieve image realistic imagery and animated visual effects. You can create convincing visual simulations using Maya dynamics and nDynamics tools. Using Maya® Fluid Effects TM , you can simulate and render viscous fluids, atmospheric, pyrotechnic, and ocean effects. Maya® nCloth TM lets you create simulations of fabric and clothing, while Maya® nParticles TM can be used to simulate a wide range of results such as liquids, clouds, smoke, spray, and dust.
Other Maya dynamic simulation tools consist of Maya® nHair TM , Maya® Fur TM , and Maya® Artisan TM brush tools. The Maya software interface is completely customizable for these users who require the ability to maximize their productivity. Maya allows users to extend their functionality within Maya by providing access to MEL TM (Maya Embedded Language). With MEL, you can customize the user interface and write scripts and macros. In addition, a full Application Programmers Interface (API) is available to enhance the power and functionality of Maya. Maya also offers a Python-based Maya API for those users wishing to use it. The content creation power of Maya is provided to users in a built-in software application that is designed to enhance user productiveness and ease of use.
YOU WILL LEARN:
CONVENTIONS
MAYA INTERFACE
2D IMAGES
PROFILE CURVE
FLUID EFFECTS
SCRIPTING LANGUAGES
CONVENTIONS USED
Maya is available for use on a huge range of operating systems. Any differences between operating systems when operating Maya are identified in the following ways:
(Windows), (Mac OS X), (Linux)
The screen illustrations and examples within Getting Started with Maya differ among the Windows, Mac OS X, and Linux operating systems. Maya’s interface is generally constant throughout these systems. When instructed to choose a menu within Maya we use the following convention:
Menu > Command (For example, File > New Scene)

When you are instructed to select the alternative box for a specific menu item within Maya, we use the following convention:
Menu > Command > Option (for example, Create > NURBS Primitives> Sphere >

THE MAYA INTERFACE
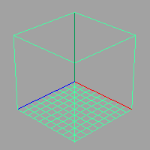
The Maya workspace is where you conduct most of your work within Maya. The workspace is the central window where your objects and most editor panels appear. When you begin Maya for the first time, the workspace shows by default in a perspective window or panel. There are the other factors of the default perspective view panel: The panel is labeled persp at the bottom to point out that you are viewing the Maya scene from a perspective camera view. The panel has its very own menu bar at the top left corner of the panel. These menus permit you to access tools and functions related to that specific panel. The grid is displayed with two heavy lines intersecting at the center of the Maya scene. This central location is known as the origin. The origin is the center of Maya’s 3D world, and with all object’s directional values measured from this location.

Main Menu bar
Tools and items are accessible from pull-down menus positioned at the top of the user interface. In Maya, menus are grouped into menu sets. These menu units are accessible from the Main Menu bar.
The Main Menu bar appears at the top of the Maya interface directly under the Maya title bar and displays the chosen menu set. Each menu set corresponds to a module within Maya: Animation, Polygons, Surfaces, Rendering, and Dynamics. Modules are a technique for grouping associated features and tools. You switch between menu sets through selecting the appropriate module from the menu selector on the Status-Line (located directly below the File and Edit menus). As you switch between menu sets, the right-hand portion of the menus change, but the left-hand portion stays the same; the left-hand menus are common menus to all menu sets. The left-hand menus include File, Edit, Modify, Create, Display, Window, and Assets.

Status Line
The Status Line, located directly below the Main Menu bar, contains a variety of items, most of which are used while modeling or working with objects within Maya. Many of the Status-Line items are represented by a graphical icon. The icons save space in the Maya interface and allow for quick access to tools used most often.
Shelf
The Shelf is located directly below the Status line. The Maya Shelf is useful for storing tools and items that you use frequently or have customized for your own use. You can keep the tools and items you use most frequently in a location that provides handy access. Maya has some of the Shelf items pre-configured for your use.
USING 2D REFERENCE IMAGES
You can use front, side, and top views from drawings, sketches, or images to help visualize your 3D model in Maya, a lot like an architect or engineer creates their designs from the design and elevation views of a blueprint. You can import 2D images into your orthographic camera views as image planes. An image plane is a 2D object (plane) that places an image file in the scene view.By default, an image plane only appears in the camera to which the image plane is connected. Image planes are additionally used to create backgrounds and environments when rendering.
When you load an image into an image plane, it appears in your chosen orthographic view at the origin along an axis that is perpendicular to the selected orthographic view. You can refer to the image in the orthographic view to outline the silhouette and character lines of your model. You can move the image plane, change its transparency, or turn it off.
To load reference pictures into the front and side orthographic views In the Toolbox, click on the Four View shortcut from the Layout Shortcuts bar.The perspective view is located in the top right corner and the other views show your scene from the top, front, and side.
In the front view panel menu, select View > Image Plane > Import Image.
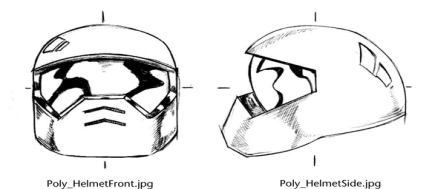
In the browser that appears, select the image file named HelmetFront.jpg, and click Open.
HelmetFront.jpg appears in the front view and depicts a drawing of the helmet.
In the side view panel menu, select View > Image Plane > Import Image.
Select the image files named HelmetSide.jpg and click on Open. By referring to the image planes in the orthographic views as you work, you can correlate how a feature in one view, appears in another. While a top view reference image is useful in many cases, it isn’t imperative for this lesson. The image planes can be set so they appear partially transparent to enable you to work with the polygonal elements more easily. To do this you’ll choose the front and side orthographic cameras and modify the transparency of the images.
CREATING A PROFILE CURVE
Revolve is a common modeling approach similar to shaping a vase on a spinning potter’s wheel. You need to first create a profile curve in an orthographic view and use the Revolve tool to create a surface.
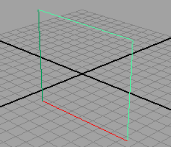
To create a profile curve
1. Select Panels > Layouts > Four Panes so you can see multiple views of the scene.
2. Select Create > CV Curve Tool.
This is the most normally used tool for drawing curves.
3. In the the front view, click on the numbered positions as shown in the figure. Make sure the first and last positions are on the grid’s Y-axis (the thickest vertical line of the front view’s grid).

Also, click on three times in the same spot for positions 9, 10, and eleven This is necessary to create a sharp point or nook in the curve. To change the position of the most current point clicked, you can middle-mouse drag it.
4 (Windows and Linux) After you click on position 13, press Enter to complete the curve’s creation.(Mac OS X) Press Return to complete the curve’s creation.
FLUID EFFECTS
TO CREATE A TWO-DIMENSIONAL FLUID CONTAINER
Select Fluid Effects > Create 2D Container.
Maya creates an empty 2-dimensional fluid container established at the origin in the XY plane.
Next, you add fluid to the container. To do this, you add values to the container for particular properties of the fluid: Density, Color, Velocity, Fuel, and Temperature. You can add any or all of these properties to create a fluid effect. One way to put properties into a container is to create them with a fluid emitter.
CREATING A 3D CONTAINER
1. Select Fluid Effects > Create 3D Container > .
The Create 3D Container Options window opens.
2. In the window, choose Edit > Reset Settings to fix the Resolution and Size settings to the defaults.The default container size and resolution are enough to illustrate the concepts in this lesson.
3 Click Apply and Close.
Maya creates an empty 3-dimensional fluid container centered at the origin.
Next, add fluid to the container. In the first lesson, you added fluid to the container by emitting it into a Dynamic Grid. In the second lesson, you added fluid to the container by choosing a predefined gradient. You will add fluid to the container by painting property values inside it.
SCRIPTING LANGUAGES IN MAYA
Maya supports two scripting languages:
1. MEL (Maya Embedded Language) is a proprietary scripting language modeled after Unix shell script.
2. Python is a current addition to Maya that gives the same access to Maya’s commands as MEL. Python is a widely-used modern programming language. Maya’s user interface is built using scripts that execute (call) Maya commands. As Python is the latest addition to Maya, the majority of the scripts accessed through the consumer interface are written in MEL.
For example, when you click on the sphere icon on the Shelf or choose an item from a menu, Maya calls MEL commands to create a sphere or execute the command associated with the menu item.
What MEL appears like:
Invoking commands in MEL has the primary structure of a command followed by using a combination of flags and arguments. Flags are prefaced through the hyphen character in MEL.
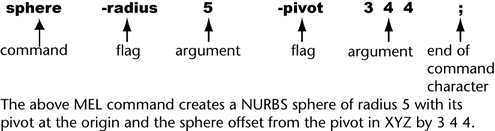
All MEL commands are case-sensitive; SPHERE is not the same as the sphere (and returns an error message). If no flags are provided, the command executes with default arguments. The command fails if it requires arguments that it did not get.
You can get assist with MEL in three ways:
1. To access help on a specific MEL command, open the MEL Command Reference by selecting Help > MEL Command Reference.
2. Help can also be accessed from within the Script Editor through the use of the Maya Command help. For example, entering the help sphere indicates a listing of flags that can be used with the sphere command.
3. More data on all factors of using MEL commands are also available in the MEL and Expressions guide, part of the Maya Help. Open the Maya Help and select
Using Maya > General > MEL and Expressions.
BASICS OF PYTHON
Python and MEL are scripting languages with equal prominence and capabilities in Maya. Python can access all the Maya commands that MEL does.
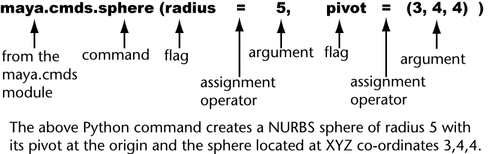
Python accesses Maya commands via the Python module maya.cmds. Modules in Python are units of commands that add performance to Python and need to be imported before using any of the commands from a module. Flags in Python are carried out through Python’s named arguments. You specify which argument to modify and use the task operator (=) to assign a new value to the argument.
In order to run this or any instance command, you need to have imported the Python module first. Enter import Maya.cmds before starting to enter Python commands.

All Python commands are case-sensitive;
maya.cmds.SPHERE is not the same as maya.cmds.sphere (and returns an error message).
Getting help on Python:
You can get help with Python in various distinct ways:
1. To access help on a specific Maya (Python) command, open the Python Command Reference through selecting Help > Python Command Reference.
2. You can also access help on Maya Python commands from within the Script Editor by using the Maya Command help(). For example: typing maya.cmds.help(“sphere”) outputs a list of viable flags that can be used with the sphere command.
3. Help for native Python commands is accessed from within the Script Editor through typing help(“command”) where the command is the Python command you prefer to access help for.
4. More data on using Python commands are additionally available in the Python guide, part of the Maya Help. Open the Maya Help and select Using Maya > General> Python.
5. All Python commands are highlighted as you enter them into the Python tab in the Script Editor.
6. There are current reference materials and documentation for Python on the web, as well as many downloadable modules to add extra functionality to Python.