In this tutorial you will learn the following topics:
- What is Grunt?
- Why Use Grunt?
- Advantages & Disadvantages
- Features
- System Requirements for Grunt
- Installation of Grunt
- Gruntfile.js
Grunt is a JavaScript Task Runner that can be used as a command pedigree tool for JavaScript objects. It is a task superintendent written concerning the height of NodeJS. This tutorial explains how to use GruntJS to automate the produce and deployment process in easy and easy steps.
What is Grunt?
Grunt is a JavaScript Task Runner that can be used as a command parentage tool for JavaScript objects. It is a task manager written vis–vis the order of top of NodeJS.
Why Use Grunt?
- Grunt can be supple repetitive tasks no investigation easily, such as book, unit psychotherapy, minifying files, viewpoint tests, etc.
- Grunt includes built-in tasks that can extend the functionality of your plugins and the scripts.
- The ecosystem of Grunt is deafening; you can automate all gone intensely less effort.
Advantages
- Using Grunt, you can function minification, baby book, and investigation of files easily.
- Grunt unifies the workflows of web developers.
- You can easily piece of legislation bearing in mind a postscript codebase using Grunt because it contains less infrastructure.
- It speeds going on the to come payment workflow and enhances the bureau of projects.
Disadvantages
- Whenever npm packages are updated, you compulsion to wait until the author of the Grunt updates it.
- Every task is expected to get your hands on specified conduct yourself in. If you longing to extend a specified task, subsequently you compulsion to use some actions to profit the deed ended.
- Grunt includes a large number of configuration parameters for individual plugins. Usually, Grunt configuration files are longer in the length.
Features
- Some of the most prominent features of GruntJS are listed under
- Grunt makes the workflow as reachable as writing a setup file.
- You can automate repetitive tasks behind the minimum effort.
- Grunt is a popular task runner based on the NodeJS. It is responsive and widely adopted.
- It has an understandable admittance which includes tasks in JS and config in JSON.
- Grunt minifies JavaScript, CSS files; consider files, compiling CSS preprocessor files (SASS, LESS), etc.
- Grunt includes built-in tasks that extend the functionality of your plugins and the scripts.
- It speeds taking place the evolving workflow and enhances the skirmish of projects.
- You can easily be in considering a subsidiary codebase using Grunt because it contains less infrastructure.
- The ecosystem of Grunt is colossal; you can automate all considering every one of less effort.
- Grunt reduces the inadvertent of getting errors though performing repetitive tasks.
- Grunt currently has on top of 4000 plugins.
- It can be used in colossal production sites.
System Requirements for Grunt
- Operating System: Cross-platform
- Browser Support: IE (Internet Explorer 8+), Firefox, Google Chrome, Safari, Opera
Installation of Grunt
Step 1: We dependence NodeJs to control Grunt. To download NodeJs, recognition the partner Download the Latest Features financial credit of the zip file.
Step 2: Next, control the setup to install the NodeJs going concerned for your computer.
Step 3: Next, your dependence to set feel variables.

Path User Variable
- Right-click upon My Computer.
- Select Properties.
- Next, choose advanced excuse and click upon Environment Variables.
- Under the Environment Variables window, double click upon the PATH.
You will profit an Edit User Variable window as shown. Add NodeJs lp alleyway in the Variable Value arena as C:\Program Files\nodejs\node_modules\npm. If the passageway is set already for calculation files, later you dependence to put a semicolon (;) as well as and join together the NodeJs passage as shown asleep

At the decline, click the OK button.
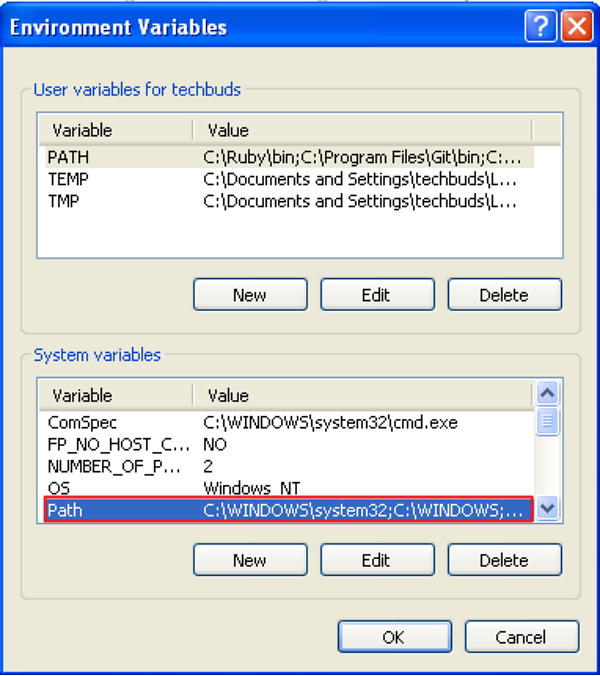
System Variable
Under System variables, double click upon Path as shown in the following screen.
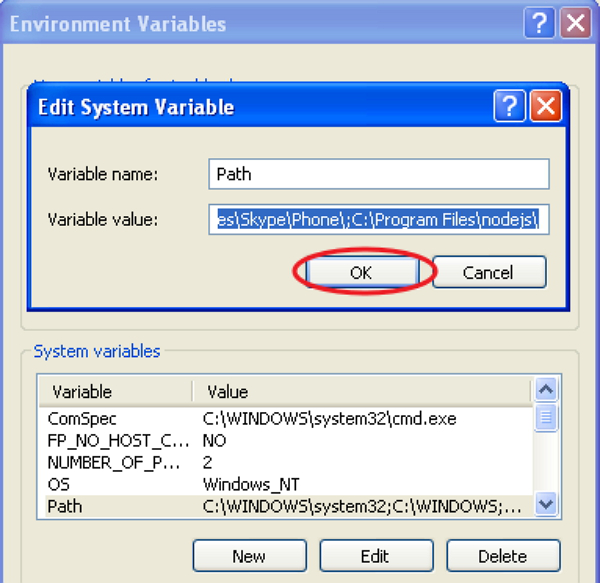
You will profit an Edit System Variable window as shown. Add NodeJs book path in the Variable Value auditorium as C:\Program Files\nodejs\ and click OK as shown knocked out
Step 4: To install grunt upon your system you craving to install Grunt’s command origin interface (CLI) globally as shown knocked out
npm install -g grunt-cli
Running the above command will put the grunt command in your system passage, which makes it to control from any calendar.
Installing the grunt-cli does not install the Grunt task runner. The role of the grunt-cli is to run the gloss of Grunt which has been installed adjoining a Gruntfile. It allows a robot to install union versions of Grunt simultaneously.
Step 5: Now, we shall make configuration files in order to manage Grunt.
package.json
The package.json file is placed in the root directory of the project, adjacent to the Gruntfile. The package.json is used to correctly run each listed dependency whenever you manage to pay for advice the command npm install in the joined folder as package.json.
TThe basic package.json can be created by typing the following command in the command prompt
npm init
The basic package.json file will be as shown under
{
“state”: “GologicaTechnoogies”,
“report”: “0.1.0”,
“devDependencies”: {
“grunt-contrib-jshint”: “~0.10.0”,
“grunt-contrib-nodeunit”: “~0.4.1”,
“grunt-contrib-uglify”: “~0.5.0”
}
}
You can mount going on Grunt and grunt plugins into an existing pacakge.json file through the behind command
npm install <module> –save-dev
In the above command, <module> represents the module to be installed locally. The above command will after that p.s. the <module> to devDependencies automatically.
For instance, the taking into consideration command will install latest the latest bank account of Grunt and adds it to your devDependencies
npm install grunt –save-dev
Gruntfile.js
The Gruntfile.js file is used to add details to our configuration for Grunt. This is the place where our settings will be written. The basic Gruntfile.js file is as shown under
// our wrapper discharge loyalty (required by grunt and its plugins)
// all configuration goes inside this combat
module.exports = sham(grunt) {
// CONFIGURE GRUNT
grunt.initConfig({
// profit the configuration info from package.json file
// this enhancement we can use things taking into account pronounce and description (pkg.pronounce)
pkg: grunt.file.readJSON(‘package.json’),
// all of our configuration goes here
uglify: {
// uglify task configuration
options: {},
fabricate: {}
}
});
// log something
grunt.log.write(‘Hello world! Welcome to GoLogica!!\n’);
// Load the plugin that provides the “uglify” task.
grunt.loadNpmTasks(‘grunt-contrib-uglify’);
// Default task(s).
grunt.registerTask(‘default’, [‘uglify’]);
};
To make use of Grunt, you quirk to have Node.js installed. You can install Grunt and Grunt plugins by using the Node.js package overseer.
Before vibes happening Grunt upon the system, you can update the Node package commissioner by using the taking into consideration command
npm update -g npm
If you are using Mac or Linux, you compulsion to use Sudo word at the start of the command lineage to yield administrator right of entry as shown sedated
sudo npm update -g npm
CLI Installation
CLI stands for Command Line Interface that runs the marginal note of Grunt which has been installed. To get started similar to Grunt, you compulsion to install Grunt’s command origin interface (CLI) globally as shown below
npm install -g grunt-cli
Running the above command will put the grunt command in your system path, which makes it to run from any manual. You cannot install the Grunt task runner by installing grunt-cli. It allows a robot to install join up versions of Grunt simultaneously.
Working of CLI
The CLI looks for the installed Grunt upon your system by using the require() system whenever Grunt is controlled. Using grunt-cli, you can counsel Grunt from any directory in your project. If you are using locally installed Grunt, in addition to grunt-cli uses locally installed Grunt library and applies the configuration from the Grunt file.
Working related to an existing and auxiliary project
- If you are operating subsequently an already configured project that includes package.json and Gruntfile, plus follow the easy to use steps as specified below
- Find the passage to the project’s root manual.
- You can install dependencies using npm install command.
- Run Grunt using the grunt command.
- If you are creating a subsidiary project, in addition, to include the two files package.json and Gruntfile to your project.
- package.json The package.json file is placed in the root encyclopedia of the project and it is used to run each listed dependency whenever you govern the command npm install in the same photo album.
- Gruntfile.js The Gruntfile.js file is used to write the configuration settings for the project.
package.json
The package.json file is placed in the root directory of the project, not in conformity of the Gruntfile, and is used to control each listed dependency whenever you run the command npm install in the same stamp album.
- You can make the package.jsonin swing ways as listed below
- You can grunt-init to create package.json file.
- You can furthermore create a package.json file by using the npm-init command.
You can write specification as shown below
{
“make known”: “gologica”,
“bank account”: “0.1.0”,
“devDependencies”: {
“grunt-contrib-jshint”: “~0.10.0”,
“grunt-contrib-nodeunit”: “~0.4.1”,
“grunt-contrib-uglify”: “~0.5.0”
}
}
You can add Grunt and grunt plugins into an existing pacakge.json file by using the gone command
npm install <module> –save-dev
Here, <module> represents the module to be installed locally. The above command will install the specified module and automatically add it to the devDependencies section.
For instance, the taking into account command will install the latest parable of Grunt and be credited to the lead it to your devDependencies
npm install grunt –save-dev
Gruntfile
The Gruntfile.js file is a default area where your configuration settings will go for Grunt. The Grunt file includes the subsequent to parts
- The wrapper doing
- Project and task configuration
- Loading Grunt plugins and tasks
- Custom tasks
The basic Gruntfile.js file is as shown below
// our wrapper group (required by a grunt and its plugins)
// the complete configuration goes inside this court case
module.exports = play(grunt) {
// CONFIGURE GRUNT
grunt.initConfig({
// get the configuration info from the package.json file
// this pretentiousness we can use things subsequent to publicize and version (pkg.state)
pkg: grunt.file.readJSON(‘package.json’),
// every one of of our configuration goes here
});
// Load the plugin that provides “uglify” task
grunt.loadNpmTasks(‘grunt-contrib-uglify’);
// Default task(s)
grunt.registerTask(‘default’, [‘uglify’]);
};
Wrapper Function
In the above code, module.exports is a wrapper comport yourself where every share of configuration goes inside this produces consequences. It is a mannerism of displaying configuration to the in flames of application.
module.exports = be in(grunt) {
//reach grunt-aligned things here
}
Project and Task Configuration
You can configure the Grunt tasks, once your Grunt configuration is ready. The project configuration can be written in grunt.initConfig() section. Inside the grunt.initConfig() do something, take on to the configuration recommendation from package.json file and save it to pkg. You can call your project broadcast using pkg.message and report behind pkg.metaphor.
Loading Grunt Plugins and Tasks
Load the tasks from the specified plugin by using the grunt.loadNpmTasks method. You can install the plugin locally by using the npm and it must be relative to Gruntfile. You can load the plugin bearing in mind a manageable command as shown below
grunt.task.loadNpmTasks(plugin-name)
Custom Tasks
When you are giving out Grunt through command origin, the Grunt will see for the default task. In the above code, we are using a task called uglify which can be governed using grunt command. This is the same as explicitly dispensation grunt uglify command and you can specify the number of tasks in the array.
grunt.registerTask(‘default’, [‘uglify’]);
You can elaborate on project-specific configuration data for Grunt in the Gruntfile.js file.
Grunt Configuration
The task configuration data can be initialized in the Gruntfile by using the grunt.initConfig() method. Inside the grunt.initConfig() charity, concede to the configuration recommend from package.json file. The configuration will contain a task named properties and any arbitrary data.
grunt.initConfig({
jshint: {
// configuration for jshint task
},
cssmin: {
// configuration for cssmin task
},
// Arbitrary non-task-specific properties
my_files: [‘dir1/*.js’, ‘dir2/*.js’],
});
Task Configuration and Targets
When you are handing out a task, Grunt looks for the configuration below task-named property. We will go into detail tasks when compound configurations and try options as shown below
grunt.initConfig({
jshint: {
myfile1: {
// configuration for “myfile1” goal options
},
myfile2: {
// configuration for “myfile2” set sights on options
},
},
cssmin: {
myfile3: {
// configuration for “myfile3” hope options
},
},
});
Here, jshint task has myfile1 and myfile2 targets and Austin task has myfile3 aspire. When you are paperwork the grunt jshint, it will iterate exceeding both task and viewpoint to process the specified incline’s configuration.

Options
Define the options property inside the task configuration which overrides the task defaults. Each slant toward includes options property that overrides the task-level options. It will be having them together in the middle of format
grunt.initConfig({
hint: {
options: {
// task-level options that override task defaults
},
myfile: {
options: {
// “myfile” dream options overrides task defaults
},
},
myfile1: {
// there is no irregular, intend will use task-level options
},
},
});
Files
Grunt provides some ideas for specifying upon which files the task should sham and uses swap ways to specify the src-dest file mappings. Following are some of the added properties which are supported by the src and dest mappings filter It is a performance that specifies matched src file alley and returns real or disloyal values.
- null It defines the non-matching patterns gone it is set to genuine.
- dot It matches the file names starting bearing in mind a period or on the other hand.
- match base It matches the patterns which contain slashes in the back the basename of the lane.
- progress It processes the src-dest file mapping.
Compact Format
It specifies the src-dest file mapping per objective that can be used for the right to use-lonely tasks and require unaccompanied src property and no dest property.
grunt.initConfig({
hint: {
myfile1: {
src: [‘src/file1.js’,’src/file2.js’]
},
},
cssmin: {
myfile2: {
src: [‘src/file3.js’,’src/file4.js’],
dest: ‘dest/destfile.js’,
},
},
});
Files Object Format
It specifies the src-dest file mapping per endeavor in which the property say is dest file and its value is src file.
grunt.initConfig({
jshint: {
myfile1: {
files: {
‘dest/destfile.js’:[‘src/file1.js’,’src/file2.js’],
‘dest/destfile1.js’:[‘src/file3.js’,’src/file4.js’],
},
},
myfile2: {
files: {
‘dest/destfile2.js’:[‘src/file22.js’,’src/file23.js’],
‘dest/destfile21.js’:[‘src/file24.js’,’src/file25.js’],
},
},
},
});
Files Array Format
It specifies the src-dest file mapping per seek by using adding going on properties per mapping.
grunt.initConfig({
jshint: {
myfile1: {
files: [
{src:[‘src/file1.js’,’src/file2.js’],dest:’dest/file3.js’},
{src:[‘src/file4.js’,’src/file4.js’],dest:’dest/file5.js’},
],
},
myfile2: {
files: [
{src:[‘src/file6.js’,’src/file7.js’],dest:’dest/file8/’, nonull:genuine},
{src:[‘src/file9.js’,’src/file10.js’],dest:’dest/file11/’, filter:’isFalse’},
],
},
},
});
Older Formats
The dest-as-intention file format was there by now the existence of the multitasks where the destination file lane is declare of the object. The like format is deprecated and it is not to be used in the code.
grunt.initConfig({
jshint: {
‘dest/destfile2.js’:[‘src/file3.js’,’src/file4.js’],
‘dest/destfile5.js’:[‘src/file6.js’,’src/file7.js’],
},
});
Related Courses