What is Google Data Studio and How to Create a Report on It?
Earlier, there used to be a time when people used to spend days exporting, filtering; and formatting facts in Excel. But thankfully, these days are long gone. And no doubt, Google Data Studio is the motive at the back of it. Data Studio, supplied using Google makes each bit of fact beneficial so that gaining access to and sharing reviews is made a lot simpler.
What is Google Data Studio?
Google Data Studio is a web-based records visualization device that helps customers construct custom-made dashboards and easy-to-understand reports. It helps in monitoring key KPIs for customers, visualizing trends, and evaluating performances over time.
What Are the Benefits of Using Google Data Studio?
- Easier setup with easy reporting.
- Creates custom-made and attractive reports.
- Pulls a couple of information sources into a single report.
- Makes sharing and collaboration simple.
- Creates up to 5 custom-made reviews that are free of cost.
- Helps the person join 150+ facts sources.
- Monitors campaigns effectively.
- Reduces turnaround time on reporting.
How Do I Use Google Data Studio?
- Log In
Go to Data Studio by journeying https://www.google.com/analytics/data-studio, and log in the usage of your Google Analytics, Google Ads, or Search Console login information.
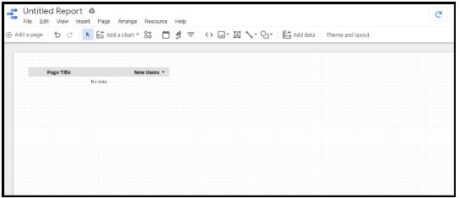
Now, you may be taken to the Google Data Studio overview page. To view the dashboard, click on the “Home” tab.
- Explore the Data Studio Dashboard
The picture under offers you a thought of how pattern reviews look, and the kind of facts you can fetch from your customized reports.
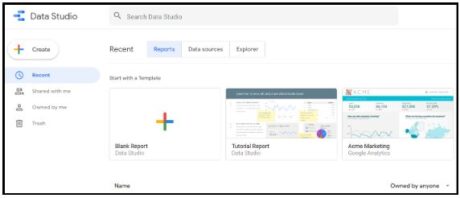
The following picture of “Welcome to Data Studio!” gives an interactive tutorial that will assist you in apprehending how to get commenced with Data Studio. Be certain now not to omit this.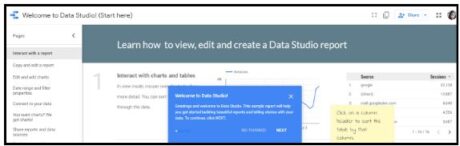
- Reports and Data Sources
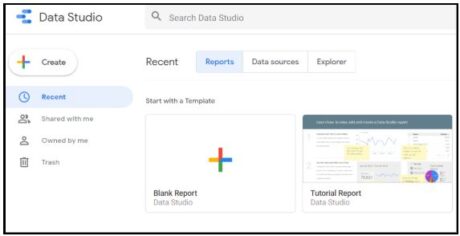
As proven in the above image, reports, and facts sources are displayed on the dashboard of Data Studio. Reports let you create record visualizations. Data sources are the occasion of a connector, that hyperlinks your document to your exterior data, such as Google Analytics, Google AdWords, etc.
- Connect Your First Source
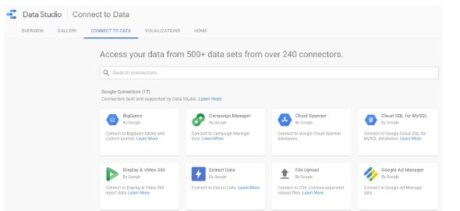
- Data sources act as a hyperlink to join a Data Studio file to a series of underlying data.
- Each information supply has special points and pre-built connectors that assist customers get admission to and join effectively with the Data Studio.
- Data Studio helps 500+ facts sources; some of the most famous sources are:
- Google Analytics
- Google Ads
- Google Search Console
- BigQuery
- YouTube Analytics
- PostgreSQL
- Search Ads 360
How to Create a Report on Google Data Studio?
To create a new report, click on the blue plus (+) button at the backside right-hand nook of the screen.
The two simple components of any records file are:
- Data sources
- Widgets
Now, let’s set up an information supply first and then construct a widget.
Step 1: Add a Data Source
Data sources can be introduced through the usage of a facts connector. Create a new clean record and add a facts supply (for example, Google Analytics) in the panel.
In this example, we will add a Google Analytics records source.
- First, add a ‘New Data Source’ button in the panel and pick out Google Analytics.
- Then, create a ‘New Report’ in the panel.
- Now, choose a Connector for developing a new records source, create a ‘New Data Source’ in the panel and add that to your report.
- Now, click on the ‘Authorize’ choice to authorize the connection between Data Studio and Google Analytics
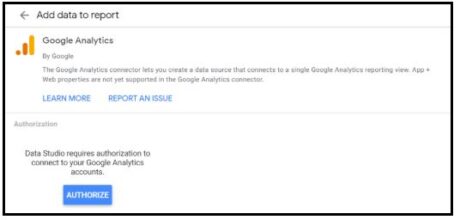
Once it is authorized, go to the “Google Analytics Account” -> “Property” -> (the view you favor to get records from) -> “Connect” ( on the proper nook of the page).
- As a result, the statistics supply is now linked to your Google Studio. Now, a full listing of metrics and dimensions is displayed in the source of the new fact. If you add these metrics and sizes to your report, click on the ‘Add to Report’ button on the page.
Step 2: Add a Widget
Now, let’s center of attention on developing visualizations that can be brought to your report. Some of the visualizations include:
- Pie Charts
- Bar Charts
- Time Series Graphs
- Tables
- Maps
- Scorecards
Additionally, you can consist of plan factors like textual content packing containers that will make you recognize your reviews greater easily.
Some of the different essential controller factors in the widgets are Date Selector (changes the date vary of the data), Filter Controller (allows to alter the complete information in the report), and Data Control (a simpler way to share reviews with friends who are inclined to use that file with their data).
Consider this instance the place you will create an easy time-series format that suggests the number of periods that Google Analytics recorded.
- In the toolbar, pick the “Insert” -> “Time Series” option.
- With the cursor, sketch the report.
- As a result, the format will be introduced to your report.

By default, the design will have ‘Session’ as the metric, and ‘Date’ as the dimension.
Step 3: Customize the Widget
The metric and dimension can be modified the way you want.
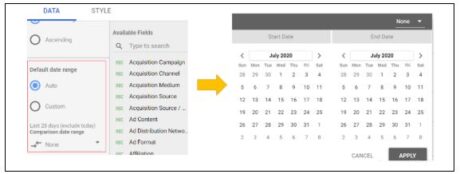
For example, you can add a contrast period, which permits you to evaluate your current facts to the preceding one. In the Date Range section, pick ‘Auto’ and click on the dropdown menu under it and pick ‘Start Date’ and ‘End Date’.
Step 4: Create Your Report Theme
Whether your record is for clients, teams, or managers, it will be wonderful solely if introduced properly. To create your record fashion and formatting, click on the ‘Theme and layout’ alternative in the toolbar.
![]()
Any modifications made right here will replicate your report.
This device has many in-built subject matters such as simple, easy dark, constellation, groovy, etc. But, right here it is easier to layout your style.
Some of the brightly colored subject matters reachable are displayed below:
In the toolbar, go to “Theme and layout” -> “Theme” -> “Customize”
Step 5: Embed External Content in Reports
With this feature, you can embed exterior documents like Google Docs, Google Sheets, and even online movies to create an exceptional journey for your clients.
- To add content, click on “Insert” -> “URL embed”

- Now, an obvious body seems on the screen. Resize and vicinity the body as required.
- On the houses panel, go to the ‘Data’ tab, and enter the preferred URL in the exterior content material URL field.
- Now, configure the chosen content’s body border residences in the ‘Style’ tab.
Step 6: Share the Report
Here, you can share or invite others to view or get the right of entry to reviews and information sources. Also, by way of turning on hyperlink sharing, all and sundry in your corporation can view your Data Studio assets, despite now not having a Google account. So, you simply have to choose the ‘Share’ button to let your clients or friends view or edit the reports.
Conclusion
This brings us to the conclusion of the ‘Google Data Studio’ article. Here, we discovered what Google Data Studio is, what are the advantages of the use of Data Studio, and how to use Data Studio.
Google Data Studio is used by using each digital marketer for habits information analysis. Even a marketer who desires to recognize Data Studio in-depth can join our Advanced Digital Marketing route that will assist in a grasp of Google Data Studio strategies and strategies.